
JS is single threaded
By nature, JS as a high level language is single threaded. Though there is some internal multi threading, but as a user you can't write threads like Java. More on this later.
As in example Maximum call stack in v8 is 15000 frames and after that you will get maximum call stack error which you might have seen writing some recursive function.
There are a few ways to achieve(lets say emulate) multi threading, like different nodejs instances but there is no data sharing between them. We need to use message passing to share serialized objects between instances. SharedArrayBuffer can be shared between instances with worker_threads by passing message from one thread to another using postMessage(value) method
Cluster module- builtin cluster module for routing incoming requests to different instancesworker_threads module- run multiple js instances at oncechild_process module- spawn and manage a full nodejs process
Nodejs internally is multi threaded. The libraries that run in the background do support multi threading. While application code, npm modules and nodejs core apis written in JS and are single threaded.
A quick overview of multiple layers of nodejs
| Layer | Thread |
|---|---|
| Application code | Single |
| npm modules | Single |
| core nodejs apis | Single |
| Nodejs Bindings in C++ | Multi |
| OpenSSL, V8, libuv | Multi |
| Operating System | Multi |
For instance, libuv maintains a thread of I/O operations. From outside, nodejs may not be multi threaded but because of this, it can perform certain operations parallely.
The libuv thread pool size defaults to 4 and max is 1024. Can be overwritten by using env variable UV_THREADPOOL_SIZE=threads. Generally its fine to run with 4 threads. If the need comes to increase it, you need to do a perf test on productino like env first.
Nodejs process will exit if there are no more tasks on the queue. Threre are many nodejs api calls that result in creation of objects that keep the process alive. There are certain methods that can be used to force the object to no longer keep the process alive.
const t1 = setTimeout(() => {}, 1000000);
const t2 = setTimeout(() => {}, 2000000);

t1.unref(); // t1 timer is unreferenced. The callback can still run in 1000 seconds, but it won't keep the process alive.
clearTimeout(t2); // t2 time has been cleared and will never run. It no longer keeps the process alive
A point to note - setTimeout() returns an object in nodejs while in browsers it returns an integer and thats why we are able to call t1.unref() in nodejs.
Event loop
Though its similar in browsers and nodejs, it is optimized differently for the respective platforms.
Event loop phases
In nodejs there are different phases of event loop.
- Poll - I/O related callbacks
- Check - callbacks triggered via
setImmediate() - Close - callbacks triggered via
setEmitterclose events. eg. Server TCP close - Timers - callbacks scheduled using
setTimeoutandsetInterval - Pending - Special system events like "net.Socket TCP socket throws an ECONNREFUSED error"
Additionally there are two special micro task queues that can have callbacks added to them while a phase is running.
- First microtask queue - handles callbacks registered using
process.NextTick() - Second microtask queue - handles promises that reject or resolve
Callbacks in the microtask queues take priority over callbacks in the phases's normal queue. Callbacks in next tick microtask queue run before callbacks in the promise microtask queue
When event looop gets to a phase, it will run all the callbacks in that phases's queue. Once all the callbacks in a given phase are exhausted, the event loop then moves to next phase`.
Try coming up with the output before running the program and see if you understand the phases correctly.
const fs = require('fs');
setImmediate(() => console.log(1));
Promise.resolve().then(() => console.log(2));
process.nextTick(() => console.log(3));
fs.readFile(__filename, () => {
console.log(4);
setTimeout(() => console.log(5));
setImmediate(() => console.log(6));
process.nextTick(() => console.log(7));
});
console.log(8);
The outputs 8 3 2 1 4 7 6 5. Surprisingly I got the answer right.
Just a side note - tick is a complete pass, through the event loop. setImmediate() takes a tick to run, whereas process.nextTick() is more immediate - Confusing names!`
And of course async and await are just syntactic sugar for code that uses nested callbacks.
async and sync Callbacks
If you are passing a callback to a function, make sure that the callback either runs asynchrounously or synchronously and not both.
function updateSomeValue(count, callbackFn) {
    if (count <= 0) {
        return callbackFn("Not allowed"); // calling callback synchronously
    } else {
        someAsyncOperation(count, callbackFn); // calling callback asynchrounously
    }
}
By doing this you are introducing a scenario where the callback can update a value present in parent scope which may or may not be updated depending on how you called that callback function which can lead to confusing bugs.
Creating application
Let's start by creating a basic structure of the application that will be used in later chapters. All the code that we will write will go inside these two directories. You can have a parent directory named learning nodejs so that the common files can go there.
web-api- server from browser povrecipe-api- server from web-api pov
Scaling
Cluster module
Cluster module allows running multiple copies of a Node.js application on the same machine, dispatching incoming network messages to the copies. Its similar to child_process module which provides a fork() method for spawning Node.js sub process. But cluster modules also provides a mechanism for routing incoming requests.
Creating cluster
#!/usr/bin/env node
const cluster = require('cluster');
console.log(`master pid=${process.pid}`);
cluster.setupMaster({
    exec: __dirname+'/producer-http-basic.js'
})
cluster.fork();
cluster.fork();
cluster.on("disconnect", worker => {
    console.log("disconnect", workder.id);
}).on("exit", (worker,code, signal) => {
    console.log("exit", worker.id, code, signal);
}).on("listening", (worker, {address, port}) => {
    console.log("listening", worker.id, `${address}:${port}`);
})
master pid=30839
worker pid=30840
(node:30840) [FSTDEP011] FastifyDeprecation: Variadic listen method is deprecated. Please use ".listen(optionsObject)" instead. The variadic signature will be removed in `fastify@5`.
(Use `node --trace-warnings ...` to show where the warning was created)
Producer running at http://127.0.0.1:4000
listening 1 127.0.0.1:4000
worker pid=30841
(node:30841) [FSTDEP011] FastifyDeprecation: Variadic listen method is deprecated. Please use ".listen(optionsObject)" instead. The variadic signature will be removed in `fastify@5`.
(Use `node --trace-warnings ...` to show where the warning was created)
Producer running at http://127.0.0.1:4000
listening 2 127.0.0.1:4000
Now if you run ps command you will see 3 processes. One for master.js and two for basic.js.
Request dispatching
On macOS and Linux the requests will be dispatched round-robin to the workers by default. On windows the request will be dispatched depending on which worker is least busy.
Now try and hit the service
curl http://localhost:4000/recipes/42
In the logs you should see that the workers are hit in round robin
worker request pid=30840
worker request pid=30841
worker request pid=30840
worker request pid=30841
You can now kill one of the worker nodes and the master should still be running with the remaining workers and serve the request from it. If you kill all child workers, the master also exits.
Cons of cluster module
- Kind of an anti pattern as scalability is better done by an external tool which gives more visiblity while running instances
- This works at the later 4 TCP/UDP and not layer 7.
- Performance is not good on single cpu machine as the cpu is shared and for a high load, the worker threads will have to wait for cpu cycle
- Lastly cluster module only dispatches incoming requests to processes running on same machine.
Reverse Proxy
Sits between the backend service and the clients. It will redirect the incoming requests to running services and will also direct the response from the service to the client back.
There are multiple ways reverse proxies can redirect requests
- Round robin is default
- Based on the least busy service
- random dispatch
- based on content of the initial request such as session Id or cookie
- proxy can poll the backend and redirect to the ones which are healthy
One of the popular proxies is HAProxy.
Installing HAProxy.
For Linux you can use distro's in-built repo to install or compile from source.
For macbook you can install using brew
brew install haproxy@2.1.8
Run below to check if HAProxy was installed correctly
$ haproxy -v
HAProxy version 2.8.2-61a0f57 2023/08/09 - https://haproxy.org/
Status: long-term supported branch - will stop receiving fixes around Q2 2028.
Known bugs: http://www.haproxy.org/bugs/bugs-2.8.2.html
Running on: Darwin 22.6.0 Darwin Kernel Version 22.6.0: Wed Jul  5 22:22:05 PDT 2023; root:xnu-8796.141.3~6/RELEASE_ARM64_T6000 arm64
Start HAProxy
Create a config file haproxy/stats.cfg and add below content to it. Make sure to add a new line at the end.
frontend inbound
    mode http
    bind localhost:8000
    stats enable
    stats uri /admin?stats
Now start HAProxy
$haproxy -f haproxy/stats.cfg
You should see below logs
14:41:40 distributed-nodejs $ haproxy -f haproxy/stats.cfg
[NOTICE]   (36068) : haproxy version is 2.8.2-61a0f57
[WARNING]  (36068) : config : missing timeouts for frontend 'inbound'.
   | While not properly invalid, you will certainly encounter various problems
   | with such a configuration. To fix this, please ensure that all following
   | timeouts are set to a non-zero value: 'client', 'connect', 'server'.
Now if you hit the below URL, you should see a dashboard
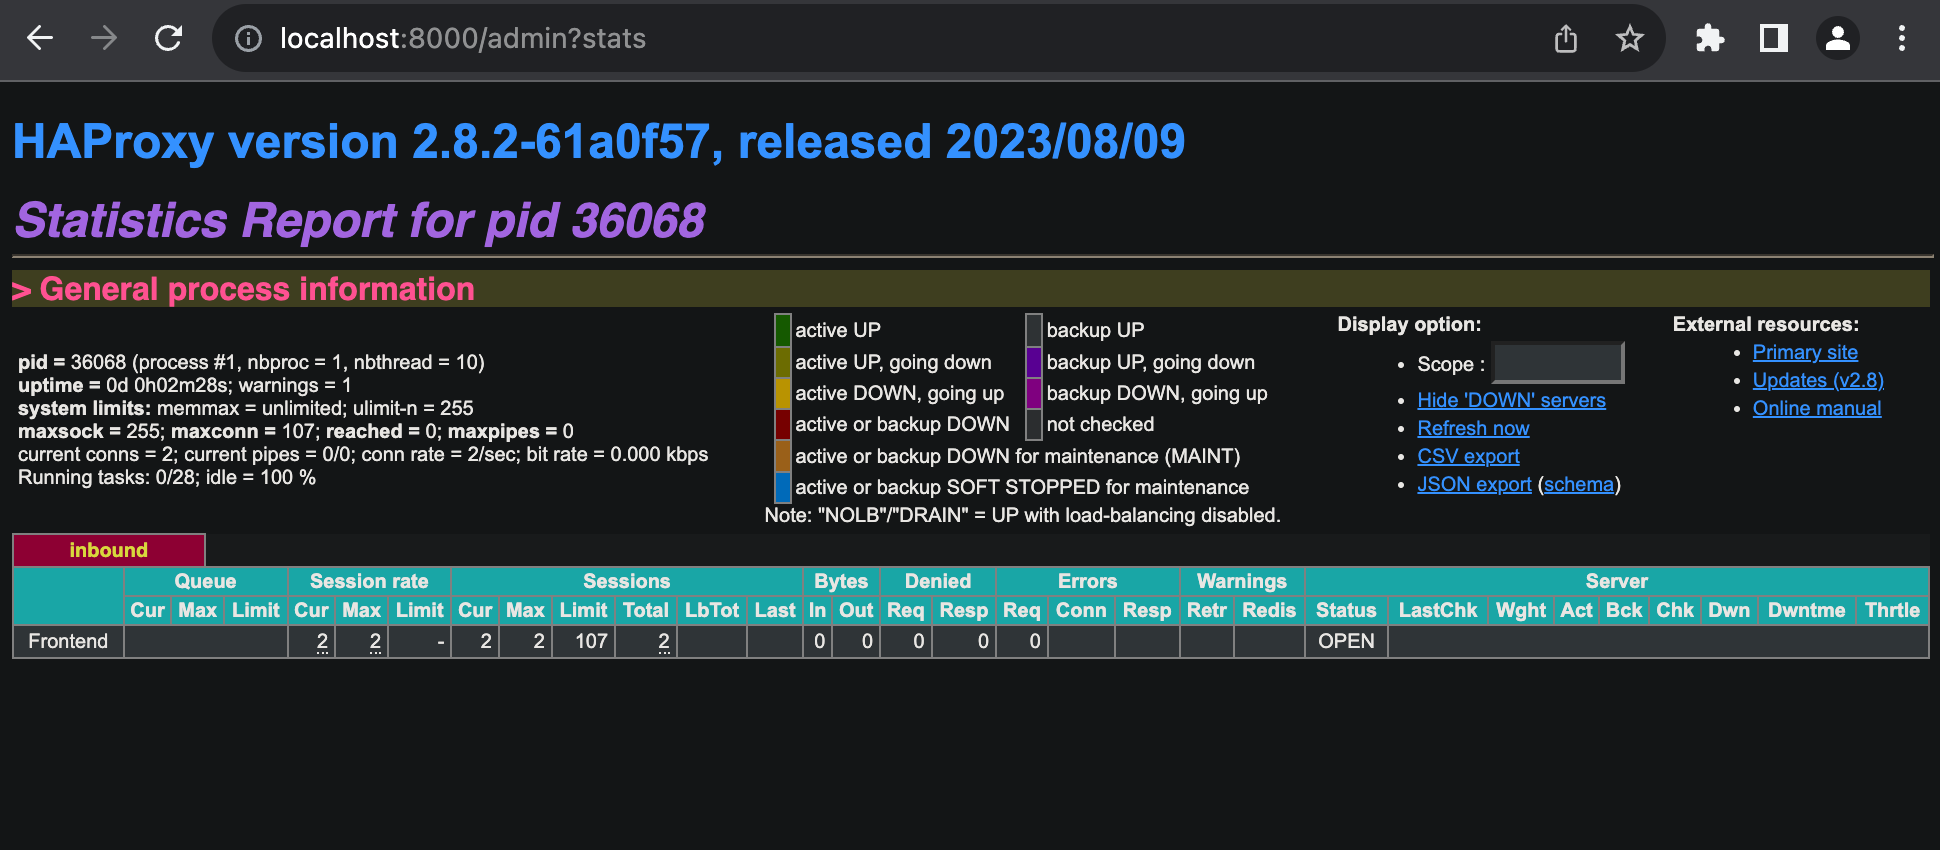
If you setup HAProxy with multiple routes, you will see a dashboard like below
HAProxy alternatives
Nginx, ELB, Traefik, Kong Gateway.
One point to note about Nginx. It can also act as a web server while HAProxy can't. Nginx can map requests to files on disk.
Configuring HAProxy with multiple backends. Create a config file like below.
defaults
    mode http
    timeout connect 5000ms
    timeout client 50000ms
    timeout server 550000ms

frontend inbound
    bind localhost:3000
    default_backend web-api
    stats enable
    stats uri /admin?stats

backend web-api
    option httpchk GET /health
    server web-api-1 localhost:3001 check
    server web-api-2 localhost:3002 check
If we compare this to node's cluster module, we don't need a third nodejs process running. Instead the routing will be handled by HAProxy process. Moreover, now using HAProxy we can route requests to outside the machine which is what generally a use case for all scalable solutions in the cloud.
Now to test the setup perform below opeerations
node recipe-api/producer-http-basic.js                      // start nodejs backend
PORT=3001 node web-api/consumer-http-healthendpoint.js      // start api-1
PORT=3002 node web-api/consumer-http-healthendpoint.js      // start api-2
haproxy -f ./haproxy/load-balance.cfg                       // start HAProxy
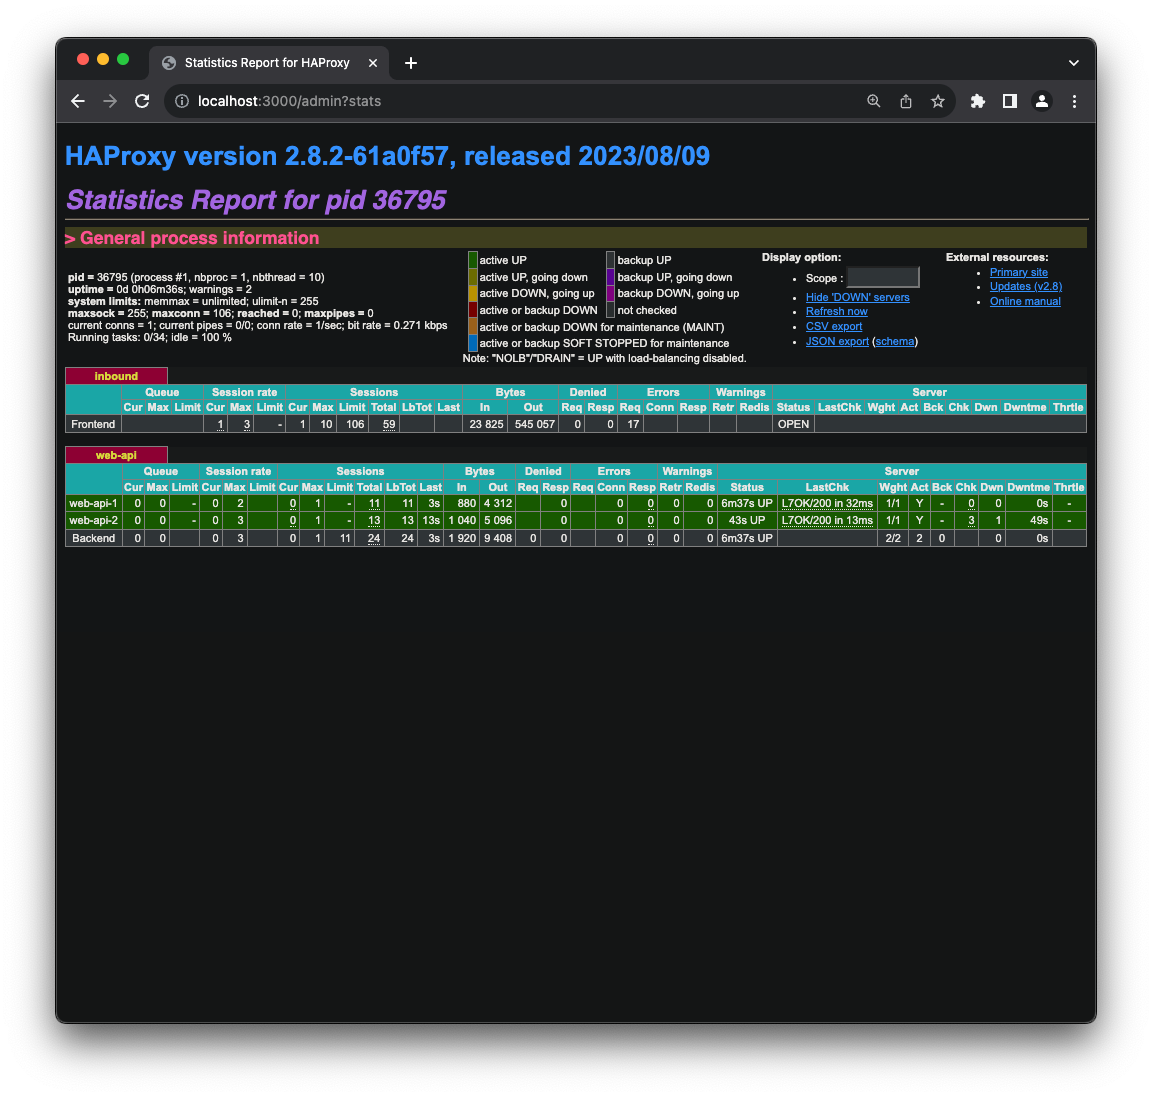
Run below command multiple times to see that response is coming from api-1 and api-2 in round-robin method.
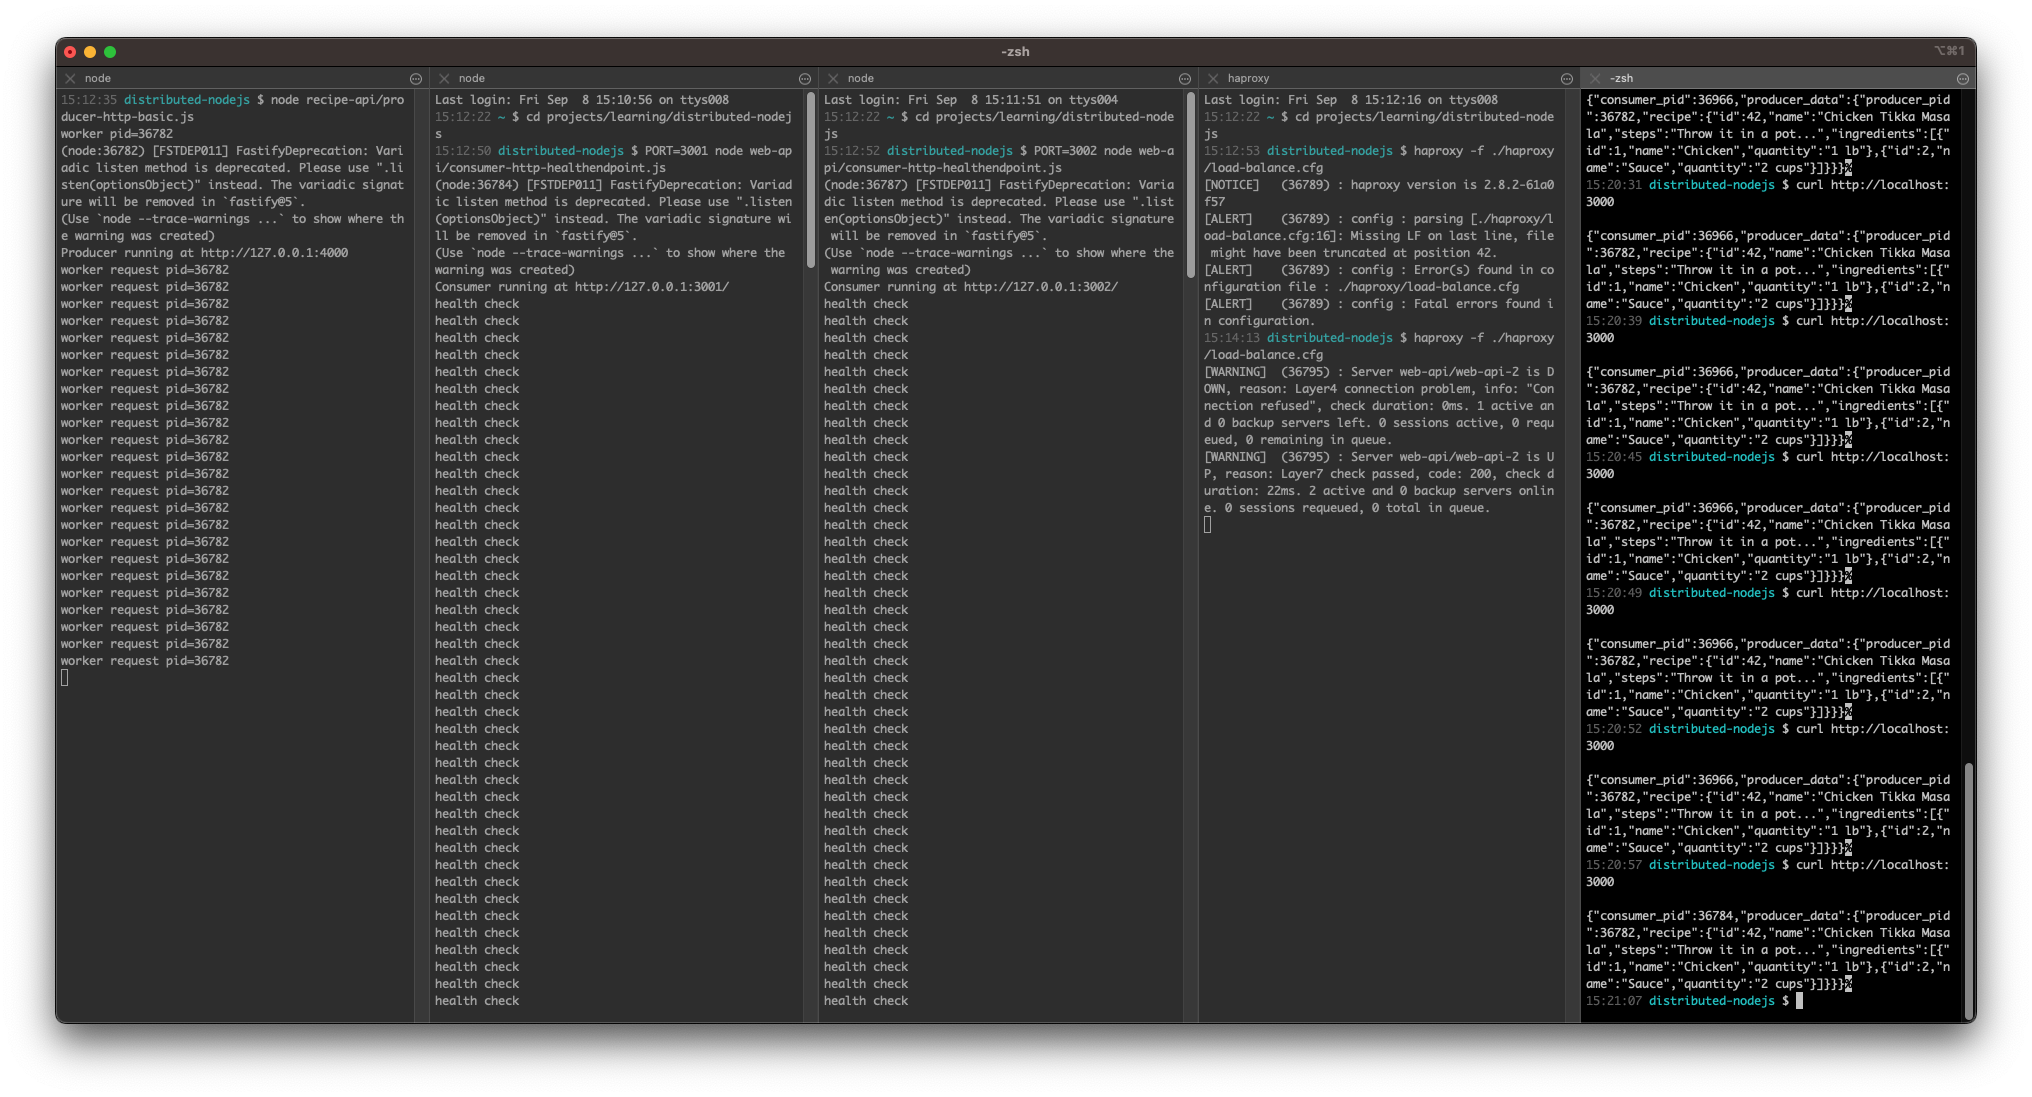
If you close one of the processes, HAProxy will redirect the requests to remaining processes. Same can be observed on the HAProxy Dashboard page.
And if all api endpoints go down, you will endup in error which can be seen in HAPRoxy logs as well.
15:29:59 distributed-nodejs $ curl http://localhost:3000

<html><body><h1>503 Service Unavailable</h1>
No server is available to handle this request.
</body></html>
Compression
HAProxy can do compression as well. You can configure HAProxy to compress the response before sending to the client. There are multiple config options.
Configure the compression by adding below lines to HAProxy config
backend web-api
    compression offload
    compression algo gzip
    compression type application/json text/plain
    server web-api-1 localhost:3001
And you can test by running below commands
$ node recipe-api/producer-http-basic.js
$ PORT=3001 node web-api/consumer-http-basic.js
$ haproxy -f haproxy/compression.cfg
$ curl http://localhost:3000/
$ curl -H 'Accept-Encoding: gzip' http://localhost:3000/ | gunzip
TLS Termination
HAProxy can do encryption as well. You need to generate a .pem certificate first.
Generate certificate and private key. Combine both to one file combined.pem.
openssl req -nodes -new -x509 -keyout haproxy/private.key -out haproxy/certificate.cert
cat haproxy/certificate.cert haproxy/private.key > haproxy/combined.pem
Configure HAProxy like below to use the .pem file for SSL
global
    tune.ssl.default-dh-param 2048

frontend inbound
    bind localhost:3000 ssl crt haproxy/combined.pem
    default_backend web-api
And test it out by using a curl command. You will need to use --insecure because the certificate is still self signed. If you use a certificate from a known CA, you do not need this flag. One of my earlier posts around related topic - thisisunsafe
15:49:57 distributed-nodejs $ curl --insecure https://localhost:3000/
{"consumer_pid":42250,"producer_data":{"producer_pid":42054,"recipe":{"id":42,"name":"Chicken Tikka Masala","steps":"Throw it in a pot...","ingredients":[{"id":1,"name":"Chicken","quantity":"1 lb"},{"id":2,"name":"Sauce","quantity":"2 cups"}]}}}%
Rate limiting
If you need to limit the server to handle only a max number of connections at a given time, use below to achieve it
One way is to do this with the nodejs http server.
const http = require('http');

const server = http.createServer((req, res) => {
    console.log("current conn", server._connections);
    setTimeout(() => res.end("OK"), 10_000);
});

server.maxConnections = 2; // rate limiting the server itself
server.listen(3020, 'localhost');
But this would mean a hard limit to all the servers that you start.
Here HAProxy can help. It can queue the requests for the application as well. So the server not necessarily needs to be limited to a fixed number. This approach makes it easy to configure the scaling when you are using external tools for service orchestration like k8s etc.
defaults
    maxconn 8
    mode http

frontend inbound
    bind localhost:3010
    default_backend web_api

backend web_api
    option httpclose
    server web-api-1 localhost:3020 maxconn 2
global maxconn includes incoming and outgoing backend connections
Now start HAProxy with new config and run some curl commands parallely. You will see that the server is able to serve more than 2 requests. The requests holds with HAProxy and only goto nodejs when the count comes below the threshold.
SLA and Load Testing
To start load testing we need to install autocannon. There are many alternatives to autocannon like Apache Bench(ab), wrk, and Siege.
npm install -g autocannon
Create new directory benchmark/ and create a file native-http.js within it with below contents
#!/usr/bin/env node

const HOST = process.env.HOST || '127.0.0l1';
const PORT = process.env.PORT || 4000;

require("http").createServer((req, res) => {
    res.end("ok");
}).listen(PORT, () => {
    console.log(`Producer running at http://${HOST}:${PORT}`)
});
Now first start the service and then run autocannon to start a loastest.
node benchmark/native-http.js
autocannon -d 60 -c 10 -l http://localhost:4000/
-d: set the overall duration of the test
-c: set the concurrent connections
-l: display a latency histogram
In case you see errors in autocannon output, use --debug to see the errors like below
Error: connect ECONNREFUSED 127.0.0.1:3001
    at TCPConnectWrap.afterConnect [as oncomplete] (node:net:1278:16) {
  errno: -61,
  code: 'ECONNREFUSED',
  syscall: 'connect',
  address: '127.0.0.1',
  port: 3001
}
Reverse proxy concerns
Create a HAProxy config to test out perf difference with and without proxy
defaults
    mode http

frontend inbound
    bind localhost:4001
    default_backend native-http

backend native-http
    server native-http-1 localhost:4000
Now start the test
node benchmark/native-http.js - Run the server
haproxy -f haproxy/benchmark-basic.cfg - Start proxy
autocannon -d 60 -c 10 -l http://localhost:4001 - Start loadtest
HTTP Compression
Add passthru.cfg to the haproxy folder. With this we can measure the cost of performing http compression in HAProxy vs Nodejs
defaults
    mode tcp
    timeout connect 5000ms
    timeout client 50000ms
    timeout server 50000ms

frontend inbound
    bind localhost:3000
    default_backend server-api

backend server-api
    server server-api-1 localhost:3001
Run below commands
Create simple index.html to be served
rm index.html ; curl -o index.html https://thomashunter.name
Start nodejs server which has compression
PORT=3001 node server-gzip.js```
To be continued with part-2...